Elements EP: Engineer’s Notes Pt. I

The First Draft

As I mentioned in the About Elements EP blog, the project has been a long time in the making and not only the composition of the tracks.

Jump back to 2013 as I moved into my final year at university and began to work on my honours project – the Elements EP. The project was a template for launching myself into the public eye as a musician and audio engineer. However, in attempt to emulate my influences – Trace Bundy and Andy Mckee – and to showcase my capabilities as an engineer, the project incorporated numerous production values, extra instrumentation and a couple of recording techniques.

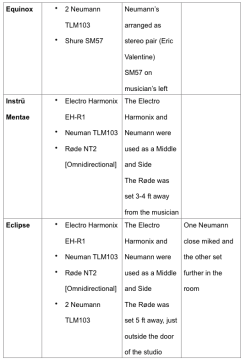
Microphones Used:

2 Neumann TLM103

Shure SM57

Electro Harmonix EH-R1

Røde NT2


Recording Techniques

    Screen Shot 2014-07-14 at 21.07.07              Screen Shot 2014-07-14 at 21.07.29


Eric Valentine’s Stereo Miking

As you can see from the two tables, I used 3 different set ups for capturing the EP. The first of which utilized Eric Valentine’s stereo image:

CD + GD

For me, this gives a great representation of the acoustic guitar and it seems to make logical sense as the stereo image captures from low string to high strings rather than the traditional horizontal stereo image.


Middle and Side

The next two images are of the Middle and Side technique I used with the Electro Harmonix and the TLM103:

INSTRU + BALLAd    ECLIPSE

Notice that I used the NT2 in the second picture: this was for Eclipse and utilized the very reverberent hallway that was outside the studio.

To read more about some basic microphone techniques, check out Capturing Sound Pt. III


Overdubs

I also used a second recording session to capture some overdubs I would use in the mixing stage such as the harmonics at the start of The Ballad of Tom Riach and Grass Dance, and general percussive hits through:

NEar:Far

This set up allowed me to capture the room sound while also maintaining some close promixity for me to blend together [those with a keen eye will recognise this room from the video for Instrü Mentae]

Once all of the guitar was tracked, I added in some extra instrumentation to make the tracks more interesting – egg shakes, thunder drum, foot stomps and hand claps. However, the overall production values, although entertaining for the listener and helped to hold their attention, I felt they took away from videos as they were filmed as a solo performance. I also recorded all six of the guitar tracks in one long evening which may of been a quick recording process, but it also left me with numerous takes to patch together; this I was not thankful for in the mixing process.

All of these factors combined made me want to do it again but this time, more naturally, under my own terms and without its reception counting towards a degree. Check out Pt. II for the recording process involved in making the EP as you hear it released today. Maybe one day I’ll unleash the overproduced version and have a giggle at my past self, but for now I’ll keep it locked away.


Neil.

‘Pitches love Shifts’ – Pitch Shifting

What are?

In our digital age, pitch shifting has become a simple process that allows us to manipulate the pitch of an audio waveform higher or lower. This allows for countless applications, a notable example is how Matt Stone and Trey Parker create the voices for their animated show South Park – they record the audio in their  ‘broken’ man-voices and then with some studio wizardry, they pitch them up to sound like children.

Pitch shifting used to be achieved solely through transposition where the audio’s pitch was changed by speeding up or slowing down the entire waveform. This would be fine for changing the pitch of small samples of audio, but when performing drastic changes the audio quality is reduced, never mind the samples new length. Now, through miracles of audio alchemy, pitches can be altered without changes to the sample length and vice versa – however this is not completely perfect as audio quality is still being lost when drastic changes are performed in the waveform.

When used in the music environment, pitch shifting is most famous for being the core mechanic in how auto-tuning works. Once a key for the song is established, auto-tuning is a plug-in on a track that reacts to the frequencies it processes and then pitches then up or down in accordance with the key. Simply put it puts out of tune audio back in tune. In this context pitch shifting is a powerful tool that can work in real time, even in live situations – sorry to ruin the ‘magic’ of the X factor. I’ll move away from Auto-tuning for now as it is an entire blog topic in itself and is abundant in popular music with artists like T-Pain using it as an effect rather than just a ‘make-me-sing-good’ button. Hell, even Obama is at it.


Other Uses

True Tape Flanging

I came across this technique when making my way from the front cover to the last of Bobby Owsinski’s “The Mixing Engineer’s Handbook” – an essential addition to any aspiring audio engineers library. Flanging is a common plug-in in most digital audio software but before digital, how was it created?

Flanging, another name for an artificially induced comb filter, got its name from the fact that the effect is achieved by actually slowing down a reel of tape by holding your finger on the edge of the reel flange (the metal piece on each side of the tape that holds the reel together).” – Bobby Owsinski

Now with digital there are no tapes so it becomes an on-screen process rather than a trying to squish your fingers in the CD drive or jamming a fountain pen in your USB port. The effect can be achieved in a few simple steps and can be varied depending on how much ‘flanging’ you want in your mix:


I. Duplicate the audio you want to flange (I have sampled an acoustic guitar).

Sometimes its easier to duplicate the entire track

II. Highlight the duplicated region and go to AudioSuite > Pitch Shift and set the shift down in cents (if using semitone scale) by anything up to 10 (this is by no means a law, just a guide).

III. Nudge back the duplicated region by 1 or 2 ms – Nudge settings can be found below and regions can be nudged by using the + and – keys on the numeric keypad (Pro Tools 10).


Original Audio:

First example with flange (pitched down one cent and nudges back one ms):

Second example with a little more flange (pitched down 3 cents and nudged back two ms):


One more thing…

If you are having trouble with out of tune vocals try duplicating the original audio and pitching one of them up one cent and the other down by a cent and blend them with the original. This should ‘trick’ the ear by taking away the focus of any sketchy notes.


I hope you got some use out of this and please feel free to ask any questions : )

Neil